Showing posts with label BASIC PHRASES. Show all posts

Monday, October 22, 2012

Feeling Sketchy - Week 30!

Hi guys! It's that time of the week again! It's time for Feeling Sketchy! We're being sponsored by Illawarra Scrapbookers, and here is our sketch -
 
And my interpretation - 

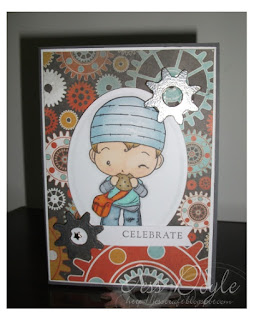
I chose this fun paper, from Kaisercraft. I coloured up my Greeting Farm image to match the papers, I found the perfect combination for the jeans using my Spectrum Noir Markers- BGR1 all over, BGR3 in the deepest shadow areas, TB3 close to the BGR3, then TB1 close to the TB3 and then BGR1 all over the jeans for blending.  
I used these cogs from Twiddleybitz chipboard, covered them in silver embossing powder, and heat set them. I then added a bit of 'wear' to the spokes. I added the sentiment, from Stampin' Up! and a star shaped brad to the middle of the bottom cog. 
Thanks for dropping around! Don't forget to join us at the challenge blog, and link up your entry!

Monday, July 16, 2012

Feeling Sketchy- Week 16

Hi guys! I crafted last night, and came up with three (!) cards, two are DT cards.... Here's the first using the newest sketch from Feeling Sketchy!
F-Sketchy 16
And, here's my card
I started out colouring this little surfer dude  - Surfing Oliver using my Spectrum Noir markers, I then cut him out, and set him aside to gather my supplies. I used patterned paper from My Minds Eye and Simple Stories I cut them down to size and layered them onto white card. I used some Silver Grosgrain ribbon, and some light aqua satin ribbon wrapped around the centre, to break it up a bit. I then layered the white card onto some Basic Gray card stock and did up my main image panel, white on top of gray. I drew in some water and sand using my markers, and then stamped the sentiment (from Stampin' Up!) Basic Phrases. I added three blue rhinestones to finish off the card. Don't forget to pop over to Feeling Sketchy and link up your card for your chance to win a prize pack from Sparkle Creations :)

Friday, January 20, 2012

Stampin' Write Markers and Basic Phrases and I create a Congratulations Card

Hi guys! I have been crafting, just not blogging! Oops! I do have a couple of cards to show you and a couple of scrapbook pages coming too! Here is the first card, I made it for my Godmothers daughter, who found out that she was accepted in to her chosen university degree this week! (congratulations Karina!)
I used a Whisper White card base, and layered it with some Old Olive designer series paper (from the Brights Stack), sponged the edges in Craft White Ink. I then layered some white ribbon, and Lucky Limeade ribbon on top. The main image panel is vellum, and has a GorJuss image, watercoloured with my Stampin' Write Markers and fussy cute her out. I stamped the sentiment from Basic Phrases in VersaMark and embossed it with White on some Pink Pirouette card stock and layered it (skewed) on some Pear Pizzazz card stock. A few pink rhinestones finishes off this card.
I am entering this into three challenges, the first is the Ribbon Carousel Sketch challenge, I really really struggled with those skewed panels, but took inspiration from Design Team member Danielle Daws. The second challenge is the DYSU Patterned Paper Challenge and last but certainly not least is The Stamp Spot Back to School Challenge. Which, as this is going to a new student, I think is appropriate. 
Thanks for dropping by!
Happy Stamping :)

Sunday, January 15, 2012

Stampin' Up! Basic Phrases and TGF Sassy Girl and I create a Birthday Card

I've been a little busy today! But, as I was blurfing (Blog surfing) I came across a challenge site that is a new one for me... and I just HAD to participate!
I started out with a Black card base, which I layered with some Whisper White, and a piece of scrap Tempting Turquoise patterned paper that was floating on my (messy) desk. I then cut out some patterned paper from Echo Park and layered it on top. I stamped my sentiment, which is from Basic Phrases and then tied some satin ribbon around the main panel. I stamped this sassy looking The Greeting Farm girl on to some watercolour paper and coloured her using my blender pen, and Basic Gray Stampin' Write Marker. I added a whole bunch of dimensional adhesive to her back and attached her to some layered Whisper White and Basic Black. 
I am entering this into 3 challenges, the first is the Anyone for Anya Challenge, which is the new one for me. This week, it is an inspiration picture, I was inspired by the black and white image and then the pop of blue. Next up, is the Friday Mashup!, I decided to not 'mash it up', but I did use patterned paper/designer paper, and lastly, is the Wee Memories Sketch challenge, this is their last ever challenge! So, if you want one last chance to play, head over and have a go. 
Ok, now I've finished filling your feeds with posts, it is my bed time!
Thanks for dropping around!

Wednesday, October 19, 2011

Stampin' Up! Snow Swirled and Basic Phrases make a really cute Christmas Card!

Hi Guys! Apparently I have been in a "Red" Mood lately..... My last three cards have been red! Here is one I made yesterday :)
Ok, so I started by colouring in this little The Greeting Farm stamp with my Stampin' Write Markers, and a Blender Pen. Then, I built my card around her... I have used Real Red Designer Series Paper (Patterns Stack). Silver stamped snowflakes from Snow Swirled (say that 10 times quickly) then sponged the piece a little with more Real Red Ink... I have wrapped a piece of Seam Binding Ribbon around it, and tied a bow. The sentiment is from Basic Phrases, and layered onto the decorative label punch in Chocolate Chip. I added a few rhinestones to finish it off.
I'm entering this into three challenges, the first is the Friday Mashup, to make a easel card or use snow flakes,..... I chose to use snowflakes... The second challenge is the CR84FN colour challenge, which is Red, Brown and Kraft. The third challenge is the sketch from Mojo Monday
Ok, thanks for dropping in! I will be back later hopefully with another (non red) card :)
Happy Stamping!

Sunday, October 2, 2011

Stampin' Up! Dasher and Delicate Doilies create a Christmas Card

Ok, so yesterday I promised you a second card, but I got caught up doing a whole bunch of other stuff, so didn't get around to posting it... I didn't forget about you all though :)
So, this has a few of my favourite things on it... One of the newest Stampin' Up! released ribbon, Seam Binding, the Delicate Doilies stamp set, and of course my favourite Christmas stamp, the a la carte, Dasher....
This is a Very Vanilla card base, layered with a piece of Baja Breeze which has been stamped randomly with the Delicate Doily that I thought looked most similar to a snowflake. I then wrapped a piece of Vanilla Seam Binding around the Baja Breeze and tied a bow, while incorporating my sentiment (Basic Phrases), which has been stamped in Baja Breeze. I stamped Dasher on a scrap piece of Vanilla, in Versamark, and heat embossed him using Silver Embossing powder. I then trimmed it down, and glued it on to a scrap piece of Baja Breeze. I attached it to the card front using dimensionals.
I am entering this into the Stamping 411 Sketch challenge, which came together super easily for me yesterday. I am also entering this into the Wee Memories favourite technique challenge, mine is of course embossing, whether dry embossing or heat embossing... I love the look of it.

Thanks for dropping by!
Happy Stamping!

Friday, September 30, 2011

Stampin' Up! Extreme Elements, I {heart} Hearts and Basic Phrases make an Anniversary Card

Hi Hi! I had a big Stampin' Up! order arrive on Tuesday, but I haven't had much of a chance to get inky... This evening, while there has been nothing on tv, I went into the craft room to have a bit of fun... This card was just screaming to be made, it's been in my head a while, so it came together really quickly!
This is a pretty simple card, I stopped into the newsagents today, and picked up some luggage tags for this purpose :) I used a Crumbcake (Kraft) base, sponged lightly around the edges. I embossed a piece of Real Red using the Big Shot, and a non Stampin' Up! embossing folder, I layered a piece of Chocolate Chip card on top, leaving a gap in the middle of the tape. I wrapped some button twine around, and attached a button. The tag has been stamped with the 'splash' from Extreme Elements (one of my newest acquisitions) and the heart was stamped in Real Red on a scrap of card. I stamped the sentiment from Basic Phrases in the corner, using my Stamp-a-majig to line it up perfectly, a little bit of Real Red ribbon was threaded through and stapled to hold it in place. Here is another shot of the card, showing the tag out
I am entering this into three challenges, the first is Freshly Made Sketches, which has another great sketch (see below), the second challenge is The Lollipop Ladies Red Frogs challenge, and to use movement... which I have done with the removable tag and the colour inspiration. The final challenge I'm entering this into is the CAS-ual Fridays ribbon loops challenge. 
Thanks for dropping round :)
Happy Stamping!

Wednesday, September 21, 2011

Stampin' Up! Up, Up, & Away (new stamp set) and I create a Birthday card

Hi guys! I have been eagerly stalking my postman, I knew he was going to arrive today with a new stamp set for me to play with, and sure enough he showed up with a Stampin' Up! box under his arm! I got the new stamp set Up, Up, & Away, from the 2011-2012 Ideas Book and Catalogue, so of course I had to go ink it up straight away :-D
Ok, so the main image panel has been sitting on my desk for a few days since I was playing with my brayer, and I'm so happy that this worked as well as I wanted it too... I have found the trick is to use Glossy Cardstock, as opposed to flat Whisper White... So, I brayered the background using Bashful Blue, Baja Breeze and a touch of Marina Mist. The masked section I sponged with a little bit of Bashful Blue to create snow peaks... Then with the new stamps in hand, I stamped the hot air balloons and pennant in Staz On. The sentiment is one of my favourites from the retired Basic Phrases. The card base is Baja Breeze with a piece of Whisper White that has some non Stampin' Up! Glitter stuck on it with Sticky Strip. I have then pop dotted the whole main image using some Dimensionals.
I am entering this into the There She Goes  Birthday Pizzazz Challenge and the Less is More anything goes challenge and Wee Memories no patterned paper challenge :)

Thanks for dropping by!
Happy Stamping!

Tuesday, August 23, 2011

Stampin' Up! I {heart} Hearts and Basic Phrases make Anniversary Cards

Hi again! Sorry it has been quiet around here again, it is peak uni assignment season, so I have spent my time doing my assignment.... This evening as a reward for getting more than half way through my Japanese assignment, I spent sometime in the craft room...
This is a Very Vanilla card base, layered with some KaiserCraft flocked paper (beautiful) I have then wrapped some pink satin ribbon around the patterned paper. I stamped three hearts from I {Heart} Hearts on some scrap Vanilla, in Daffodil Delight and Blushing Bride. I stamped the sentiment from Basic Phrases (which is retiring in 7 days!) in Basic Black and then stuck down the hearts, the Blushing Bride heart has had a  touch of dimension added, using a pop-dot. The image panel was mounted on a Blushing Bride piece, slightly bigger, and then it was all adhered to the front of the card.
I am entering this into two challenges, the first is The Paper Players sketch, which is quite a clean and simple one, but in my take, the white space element has been covered in patterned paper. The second is the Moxie Fab World Tuesday Trigger, which I have used the bold pattern on the floor as my inspiration, as well as the pink and yellow touches. 
Anyway, thanks for dropping by!
Happy Stamping!

Saturday, August 6, 2011

Stampin' Up! Basic Phrases (retiring) and I create a Birthday card

Hi! I have a clean and simple card to share with you today! It uses one of the sets I got in my Stampin' Up! starter kit, and I've only just fallen in love with... Unfortunately, it is retiring at the end of the month....
So, this is a Crumbcake card with a layer of Daffodil Delight and then a layer of Whisper White. I stamped, and heat embossed these lanterns from American Craft in Black and then coloured them with my Stampin' Write Markers and Blender Pen on Watercolour paper. I have used Wild Wasabi, Melon Mambo and Daffodil Delight. I cut them out and popped them on the white which I have wrapped some twine around. I then finished this card off with the sentiment Celebrate from Basic Phrases in Basic Grey. I will be sad to see this versatile stamp set retire in 24 days, but there is still time to get yours! 
Anyway, this is being entered into the Embellish Magazine colour and colouring challenge. 
I also wanted to share a pic of me today, I am trying to embrace the fact that I have frizzy hair that does its own thing.... Also, I got new glasses last month....
Until next time!
Happy Stamping!

Monday, July 25, 2011

Stampin' Up! Bliss and I create a Young Adult Birthday card

Hi guys, I wasn't going to post this until tomorrow, but it was a little earlier than I thought, so I will post it before heading to bed...I wanted to create a card that would be perfect for a young lady turning 18 or 21, and this is what I came up with... I must be in a monochromatic phase at the moment, as here is another one....
The purple piece started life out as a piece of Perfect Plum, but with a whole bunch of sponging of Elegant Eggplant, I don't think it looks Plum any more... I have sponged the background piece, then with my white shimmer paint mixed with a little bit of rubbing alcohol, I have created a shimmer spray, I heat set that then stamped the splatter from French Foliage on it in Elegant Eggplant. I then stamped the flourish from Sale-a-bration set Bliss in Basic Grey and highlighted some of the swirls using a silver gel pen. I have stamped and embossed this butterfly, which is from Grant Archival in silver and popped him using dimensionals. The sentiment is from Basic Phrases and is on a piece of Perfect Plum that has had the edges sponged as well. This was all mounted on to a piece of Basic Grey and three little rhinestones finish this off...
I based this card loosely on the Just Add Ink Sketch, below. This card turned out very very different to how I first imagined it... But I like it nonetheless. 
Thanks for stopping by and Happy Stamping!

Wednesday, July 6, 2011

Stampin' Up! Tree Trimmings and Shimmer Paint make very pretty Christmas Cards

Hi Guys! I run a stamp club on the Central Coast every second month, and next Wednesday is our next one. I really wanted to showcase a technique I learnt not that long ago. Faux Mother of Pearl, using Stampin' Up! Shimmer Paint. Also, I wanted one of the cards to be a Christmas in July card, to get my ladies starting to think about Christmas.... So, here is one of the cards we will be making at Stamp Club.
I have used a Whisper White base, then popped a piece of Baja Breeze through my Bigshot with the Vintage Wallpaper Embossing Folder, once it was embossed, I rubbed a White Craft ink pad lightly over it, to highlight the embossing. The main image is Glossy White card which has had White Shimmer paint "splodged" (nice terminology?) on it. Once it was dry, I sponged some Baja Breeze on top, I didn't particularly like the colour, so went over it again with a light coat of Night of Navy sponging. I then stamped the ornaments from Tree Trimmings in Night of Navy and Pacific Point, drew their strings using a Black Stampin' Write Marker, and layered it onto the card base with some dimensionals. The sentiment is from Basic Phrases, stamped in Baja Breeze, cut out using the Modern Label punch and popped with more dimensionals. 
I am entering this into The Paper Players Christmas in July Challenge, and hope the girls like this and the other cards we will be making :-)
Happy Stamping!

Saturday, June 18, 2011

Stampin' Up! Artistic Etchings and I make For You Cards

Hi Guys, I have reclaimed my craft room this evening after having a very lovely person come stay with us for a few days.... So, tonight I have made two cards.
This was actually my second card, but I want to enter it into the Less is More challenge which closes before the other card challenges.... but first, the details.... I have stamped the Eiffel Tower from the Artistic Etchings stamp set and embossed it in Black, then with some post it notes, I have masked off an area around the tower and using my Stampin' Up! Chalks created a sunrise. I have the old set of chalks with the retired colours, but when I get the chance I will be getting them in the current colours. When I was happy with the look of the blending, I carefully pulled off the post its and was left with the 'framed' image. I had a hard time trying to pick a sentiment for this one, so went with something fairly simple with the For You from Basic Phrases stamped in Basic Black. 
I am entering this into the Less is More - One layer challenge that must have a 'frame' and also the CAS-ual Friday block of colour challenge. I will be back in a little while to share the other card I made this evening.
Happy Stamping!

Sunday, May 15, 2011

Stampin' Up! Motorcycle makes Masculine Birthday cards super quick!

Hi! Back after the issues with Blogger, to be honest, I just haven't been crafting much, I've been a bit snowed under with uni work, major assignment is due next week, so I've been focusing on getting that done. I created this card today while Mark was vacuuming (yeah, he's house trained well)
 Here is a close up of the amount of detail is in this stamp!
Ok, so, I recently got an order from Stampin' Up! which included this single (á la carte) stamp, which is perfect for the men in your life, and at only AUD$13.95, you really can't go wrong. For this card, I have stamped the motorbike in Versamark, and then embossed it in black. Once I had heat set the image, I got out my Real Red Stampin' Write Marker and coloured a few selected panels, I then hi-lighted the curves with a white uni ball pen. I have stamped a fairly plain and simple Celebrate sentiment, which is from Basic Phrases, in Real Red and Versamark, and clear embossed it. I have embossed some straight lines above and below the images using my bone folder and Scor-Pal. 
Anyway, I am entering this into a couple of challenges, the first is of course Less is More, which is a one layer card including embossing. The second is the sketch, fall to layout 140 from Clean & Simple, which I have edited slightly, as I'm not a huge fan of elongated cards... anywho, here is their sketch -
I hope to be updating a little more frequently after Wednesday, so, keep an eye out.... 
Happy Stamping!

Friday, May 6, 2011

Stampin' Up! Sail Away and Botanical Gazette pair wonderfully for Masculine Cards

Ok, so you all know how much I love (love love) the á la carte stamp Sail Away...
When I saw that the new Just Add Ink challenge had been posted, I knew I was going to reach for this great stamp. I have used the cracked glass technique, which I will be showing the girls of my stamp club in the next month. It is a great technique, just emboss multiple layers of clear embossing powder. I usually do about 4-5 layers. I then popped it in the freezer when it was still warm from the last layer. Once it has been in the freezer about 10 mins, pull it out and bend your embossed piece, this will give you the cracking. Before embossing this piece, I stamped my image, coloured it, then sponged around the edges to give it a weathered look. 
Ok, onto the other deets of this card...  I have used a Crumbcake base, which I have layered with a distressed piece of designer series paper, from the new Autumn/Winter mini catalogue. This is from the Botanical Gazette collection. I then layered a piece of DSP from the Newsprint collection, which on one of the sheets has a fairly detailed 'vintage' map.... For the circle element on the Just Add Ink sketch, (see below) I used a button from my stash which fits well, I popped a sentiment from Basic Phrases (using this a lot more now...) onto a modern label punch and tied it all together with some twine. 
.
Until next time, 
Happy stamping!

Wednesday, May 4, 2011

Stampin' Up! Upsy Daisy and I create Congratulations Cards

Yesterday, after coming home from work, I crashed hard from the caffeine high, and then got NOTHING done... so, today after work, I had to get back into the craft room, the ideas were rolling around my head, and I had to do something about a few of them... I wanted to use my neglected Upsy Daisy set, which was one of the first sets I bought when I joined Stampin' Up! I wanted to show just how versatile this set was without too much work, just a change of colours really!
This one I wanted to create a shadow effect on the flowers, although I don't think it worked particularly well, ah well, next time... I have used Pretty in Pink, Bashful Blue, Certainly Celery, Soft Suede, Crumbcake and of course Whisper White. The Congrats I have used on both cards is from Basic Phrases, another super underused stamp set. I have paired all of this with some retired Stampin' Up! Buttons and some neutral twine (which is actually crochet thread in Vanilla)  I am entering this one into the Hand Stamped Sentiments Colour Challenge, and the Simply Less is More weekly challenge.  
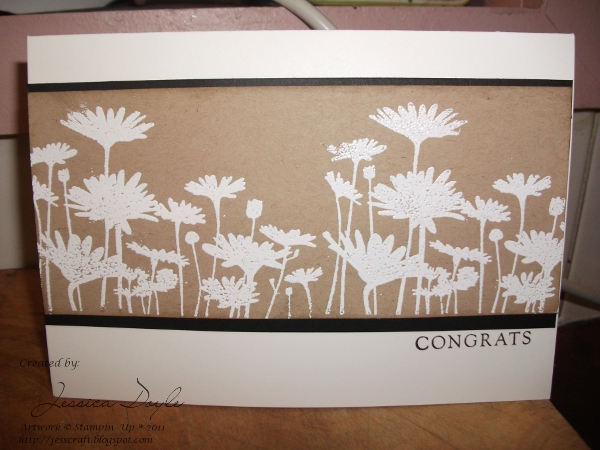
This second card I like a lot more... I guess I'm just not a pastels kinda girl.... This uses all the same stamps, but instead of shadowing, I have stamped the flowers in VersaMark and embossed them in white. The colours used are Basic Black, Whisper White and Crumbcake, once again, the sentiment is from Basic Phrases. I am entering this one into the Simply Less is More challenge as well, as a Congratulations card. 
If you want to see more projects using the Upsy Daisy stamp set, click on the link below to see all projects using this super versatile stamp set :-)

Tuesday, April 26, 2011

Stampin' Up! Artistic Etchings and I create a Friendship Spinner Card

On Sunday, I was invited to join an online craft community Crafters Anonymous. One of the great things about the community is they host a weekly class and challenges.  This week class was on how to make a spinner card, I couldn't actually make it to the online class, so I figured the instructions out from the pictures of the other class members projects.
I decided to make a card to send to a friend who I haven't seen in a while... I used the Artistic Etchings stamp set for the little crown (no, this has nothing to do with 'the wedding,' it just fit with the overall theme I was going for...) and the sentiment is from Basic Phrases. I have used the Newsprint designer series paper, which I have paired with  Not Quite Navy, Crumb Cake and Very Vanilla. 
I was inspired by the Just Add Ink Mateship/Friendship challenge, which was held to commemorate ANZAC day, which is celebrated here in Australia, and in New Zealand as a remembrance of the brave men and women who have served in the defence forces. ANZAC (25th April) is a very special day to both Kiwis and Australians as it a poignant reminder of all those troops who died on the shores of Gallipoli in battle in 1915. 
Here is something I wanted to share with you, my little sister needed to take some photos for a photography assignment for uni... I was asked to be a subject for her theme, Uncoventional Beauty. Of course I said yes.... here is my favourite photo from the day