Hi All, and welcome to the thirteenth stop on the Inkspiration blog tour! You should have come from Julie LeBlanc's wonderful website. If not, start at the Inkspiration Blog, and make your way through!
Today, I have something Christmas-y to show you. A small gift box that includes 6 mini cards!
Ok, so this is the cute little box, keep scrolling for the photography and tutorial...
I started making the cards, which are 4.25"x8.5" Crumb Cake card stock, folded in half. I then ran the front section through my Big Shot with the Polka Dot Embossing folder. The second layer is Whisper White, which has been cut to 3.25"x3.25".
The first card I made was this cute little Christmas Robin.
To make the bird, I used the two step bird punch, and cut out the following pieces
These were then layered onto the white card stock, which had been stamped with the Contempo Christmas sentiment in Real Red. I added some basic pearls to add a little bling, and I drew a dot using a white gel pen for the birdys eye.
The second card, is a little more involved, but I think it looks awesome!
The first step of this card was exactly the same as the first, the card size is also the same.
The next step was to create a base for my wreath.... This is super easy, just get a scallop circle, and then punch the centre using a slightly smaller circle punch.
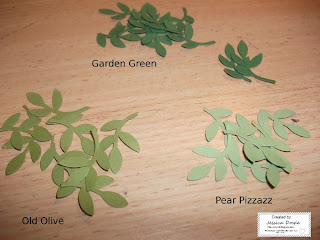
I then sat and punched just the leaves from three different coloured card stock from the two step bird punch.
These were the glued onto the scallop circle, overlapping them slightly, to make it look full!
Once I had filled my wreath, I glued it to the stamped white card stock (also a Contempo Christmas sentiment.) I tied a small bow using Real Red grosgrain ribbon and adhered it to my wreath, and added some KaiserCraft Lippy Red rhinestones to give it 'berries.'
Now, onto the box!
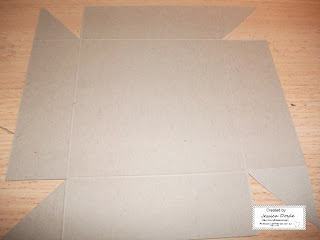
I started out with a square piece of Crumb Cake, cut at 7.25"x7.25". I then scored all around the edges at 1.5", and trimmed the boxes made into triangles (see photo)
I put double sided tape on each triangle area and folded it in, attaching it to its neighbour. Once I'd done this, I put it aside to work on the bottom of my box.
I wanted the bottom to be a little lower, so I made the square 6.25"x6.25", scored at 1" all the way around.
This photo shows you the placement of the tape. I embossed the bottom section, because, originally it was going to be the top! I left it though, as I thought it added a little bit of interest.
Once it was all folded up, I went back to the lid, and cut a white piece of card stock at 3.25"x3.25" and stamped the tree from Contempo Christmas, which I had coloured using my Stampin' Write Markers, I also stamped both sentiments on the white card, and wrote a To and From on the card stock before gluing it in place. I then added popped all the cards in the box, and tied a piece of Real Red ribbon around the box to hold it closed!
Now, we've finished up here, it's time to head onto stop 14, and the wonderful Jasmin Owsley's blog to see what she has been creating this silly season!
If you have any questions, or my instructions aren't clear, send me an email at jessidee86@gmail.com
Have fun on the hop!


Gorgeous cards and box, great use of the bird punch too!
ReplyDeleteMerry Christmas,
Fi
Wow - really beautiful, Jess!! I LOVE the wreath card (thanks for the idea with the scallop circle), and adore the colours you've used. Gorgeous project. Merry Christmas!
ReplyDeleteThis is a lovely box of cards, Jess. I love how you did the wreath, what a wonderful idea.
ReplyDeleteKaren G.
Beautiful Jess! I love how you have made the roin and wreath. They look great and would make a perfect gift.
ReplyDeletelol i agree with everyone else, the wreath card is awesome!!
ReplyDeleteI LOVE mini cards and yours are very special and packaged up so pretty!
ReplyDeleteLove your robin! That punch is on my hit list for February. Darling wreath card and your envelope for them is a great idea. Have a blessed Christmas celebrating with family and friends :)
ReplyDeleteWow again another beautiful piece of work.. Merry Christmas
ReplyDeleteThis is a great project and tutorial. Love the wreath card, I have been wanting to make one and you have inspired me to get that done!
ReplyDeleteOh Jess!! What a marvelous project! So simple yet SO elegant!!! I love it!!! Have a blessed holiday season! Thanks for sharing!
ReplyDeleteThere really is more to that bird punch than meets the eye ... isn't there!? Perhaps I do need it??? Fabbo ideas, Jess ... and a gorgeously put together project! Well done hunny! Hugs xxaxx
ReplyDeleteTOTALLY AWESOME!!!
ReplyDeleteThese all rock, love those cards and awesome giftbox idea!!!
All that work AND the big plus of tutorials! Much appreciated. The notes are beautiful and clever. A great gift.
ReplyDeleteLove your different version of the Christmas wreath...very pretty
ReplyDeleteWonderful projects! I especially love that wee wreath! TFS!
ReplyDeleteHugs,
Brandi
What a lovely gift idea Jess. I love the box you've created for the cards and your use of punches to create the bird and wreath are fantastic. Thanks for sharing. Have a lovely Christmas.
ReplyDeleteFabulous box of cards Jess.... I love all that punch art you did too! Thanks for playing in the Blog Tour! Love Keesh x
ReplyDeleteAbsolutely gorgeous project Jess! The mini cards are so sweet & the presentation box is fantastic. Thanks for the awesome tutorial & photos as well. :)
ReplyDelete